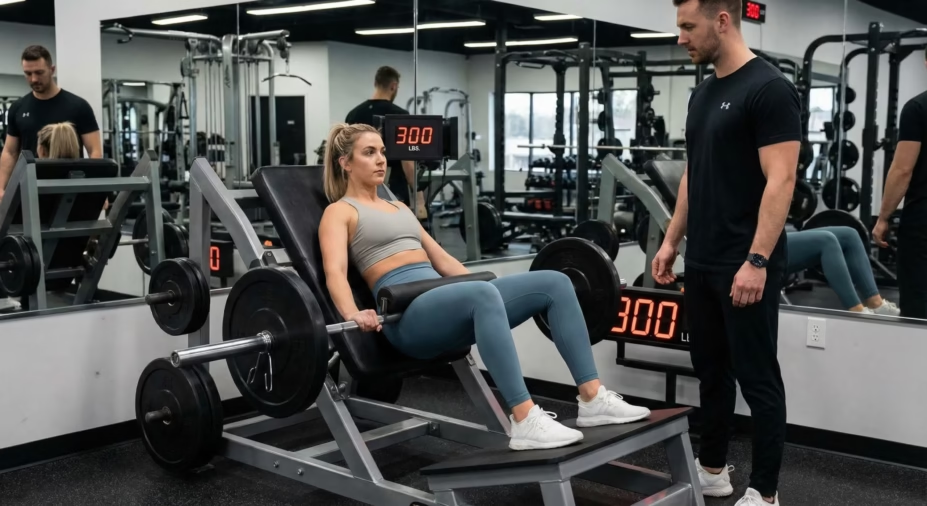
Let’s start simple. A barbell hip thrust machine is a special piece of gym equipment designed to help you work your glute muscles (the muscles in your butt). Think of it as a tool that makes one of the best glute exercises even better and safer.
Here’s how it works: You sit with your upper back against a padded support. Your feet rest on a platform in front of you. Then, you push your hips upward against resistance, creating a powerful movement that targets your glutes like nothing else.
So what makes this different from just using a regular barbell and bench? Great question! The machine gives you:
- Built-in stability so you don’t have to worry about balancing
- Comfortable padding that protects your hips from the bar digging in
- Easy weight adjustments that save you time
- Guided movement that helps you maintain perfect form
The hip thrust exercise became super popular thanks to fitness experts who proved it activates glutes better than squats or lunges.
But many people found the traditional setup (barbell resting on your hips while you lean against a bench) uncomfortable and awkward.
That’s where the machine comes in, it keeps all the benefits while fixing the problems.
Who Should Use It?
Honestly? Almost anyone! Here’s why different people love this machine:
Beginners love it because it’s less scary than loading up a barbell. The machine guides your movement, so you can focus on feeling your muscles work instead of worrying about balance.
Athletes use it to build explosive power for running, jumping, and quick direction changes. Strong glutes mean better performance in nearly every sport.
People with lower back issues find relief because hip thrusts put less stress on your spine compared to squats or deadlifts.
Anyone who wants better-looking glutes appreciates how effectively this exercise shapes and strengthens the entire backside. And let’s be honest, who doesn’t want that? 🍑
Why Your Glutes Need This Machine
Your glutes aren’t just about looks. These muscles are absolute powerhouses that affect your daily life more than you might think.
The Science Made Simple
Your glutes are made of three main muscles: the gluteus maximus (the big one), gluteus medius, and gluteus minimus. Together, they help you:
- Stand up from sitting
- Walk up stairs
- Run and jump
- Stay balanced
- Keep good posture at your desk
Here’s the thing: squats are great, but they don’t fully extend your hips. The hip thrust does. When you thrust your hips upward, you’re working your glutes through their complete range of motion. That means better muscle activation and faster results.
8 Powerful Benefits You’ll Experience
1. Superior Glute Activation 🔥
Studies show hip thrusts activate your glutes more effectively than squats, deadlifts, or leg presses. More activation equals more muscle growth.
2. Reduced Injury Risk
The machine provides stability and padding. This means less strain on your hips and lower back. You can lift heavy without the scary parts.
3. Better Athletic Performance
Want to run faster? Jump higher? Hit harder? Strong glutes are your secret weapon. They generate power for explosive movements.
4. Improved Posture
Sitting at a desk all day? Weak glutes contribute to slouching and lower back pain. Stronger glutes help pull your pelvis into proper alignment.
5. Lower Back Relief
Unlike squats that load your spine, hip thrusts target your glutes without compressing your back. Many people with back pain can do these comfortably.
6. Aesthetic Results
Let’s not pretend this isn’t important to many people. Hip thrusts build rounder, firmer glutes. They work!
7. Easy Progressive Overload
The machine makes it simple to add more weight week after week. Progressive overload is the key to building strength.
8. Confidence for Beginners
New to the gym? The machine’s guided path reduces intimidation. You’ll look like you know what you’re doing from day one.
Real Story: Sarah, a 34-year-old mom, struggled with lower back pain after her second child. Her physical therapist recommended hip thrusts.
Within six weeks on the machine, her back pain decreased significantly, and she felt stronger carrying her kids. The machine made it safe and simple to rebuild her strength.
Barbell Hip Thrust Machine vs. Traditional Barbell Setup
Should you use a machine or stick with a regular barbell and bench? Let’s break it down honestly.
| Feature |
Hip Thrust Machine |
Barbell Setup |
| Ease of Setup |
Super quick ⭐⭐⭐⭐⭐ |
Takes time ⭐⭐ |
| Glute Isolation |
Excellent ⭐⭐⭐⭐⭐ |
Very good ⭐⭐⭐⭐ |
| Progressive Overload |
Good ⭐⭐⭐⭐ |
Excellent ⭐⭐⭐⭐⭐ |
| Safety |
Very safe ⭐⭐⭐⭐⭐ |
Requires care ⭐⭐⭐ |
| Cost |
Expensive ⭐⭐ |
Affordable ⭐⭐⭐⭐⭐ |
| Space Required |
Needs room ⭐⭐ |
Compact ⭐⭐⭐⭐ |
| Comfort |
Padded ⭐⭐⭐⭐⭐ |
Can be painful ⭐⭐ |
When to Choose the Machine
Pick the machine if you:
- Are new to hip thrusts and want to learn proper form
- Have a home gym with dedicated space and budget
- Experience lower back discomfort with free weights
- Want maximum glute isolation without worrying about balance
- Train at a commercial gym that has this equipment
When to Choose the Barbell
Stick with traditional barbell hip thrusts if you:
- Are an advanced lifter who needs to load 400+ pounds
- Have limited space or budget
- Want to engage stabilizer muscles more
- Already own a barbell, plates, and a bench
- Enjoy the challenge of free-weight movements
The truth? Both work incredibly well. The “best” choice depends on your situation. Many people use both at different times!
Types of Hip Thrust Machines Explained
Not all machines are created equal. Here are the three main types you’ll find:
Plate-Loaded Machines
These look like traditional strength equipment. You add weight plates to pegs on either side of the machine.
Pros:
- You can add as much weight as you have plates
- Natural, smooth movement
- Often have rotating back pads for comfort
Cons:
Best for: Home gym owners who already have Olympic plates and want maximum loading potential.
Selectorized (Pin-Loaded) Machines
These have a weight stack built in. Just move a pin to select your weight—super simple!
Pros:
- Lightning-fast weight changes
- Perfect for drop sets and quick workouts
- Very beginner-friendly
Cons:
- Weight stack might max out for very strong lifters
- More expensive than plate-loaded versions
- Takes up more space
Best for: Commercial gyms and people who value convenience over maximum weight.
Hip Thrust Racks/Stations
These are hybrid tools—basically a specialized frame that holds a barbell for you, with padding and foot platforms.
Pros:
- More affordable than full machines
- Works with standard barbells
- Often adjustable for height
Cons:
- Still requires loading plates manually
- Less stability than dedicated machines
Best for: Budget-conscious buyers who want some machine benefits without the full price tag.
Quick tip: If you’re shopping, think about your goals. Beginners benefit most from selectorized machines. Serious lifters often prefer plate-loaded for unlimited resistance.
How to Use a Barbell Hip Thrust Machine: Perfect Form Guide
Ready to actually use the machine? Let’s walk through it step by step. Even if you’ve never done this before, you’ll look like a pro!
Before You Start: Machine Setup
Step 1: Adjust the Back Pad Height
Sit on the machine and lean back. The pad should hit you right below your shoulder blades—not at your shoulder tops or middle back. Most machines have a simple adjustment lever or pin. Test it before adding weight.
Visual cue: When you’re at the top of the movement, your shoulder blades should be firmly supported, creating a stable base.
Place your feet on the platform. Adjust the distance so that when you thrust upward, your knees form a 90-degree angle. Your shins should be vertical.
Too close? You’ll feel it in your quads. Too far? Your hamstrings will take over. Just right? Your glutes will be on fire! 🔥
Step 3: Load the Weight Correctly
Here’s a good starting point: use 50% of your body weight. If you weigh 150 pounds, start with about 75 pounds total.
Complete beginner? Start with just the machine’s resistance (no added weight) for your first session.
Make sure any plates are balanced evenly on both sides. If your machine uses pins, select a comfortable weight to learn the movement.
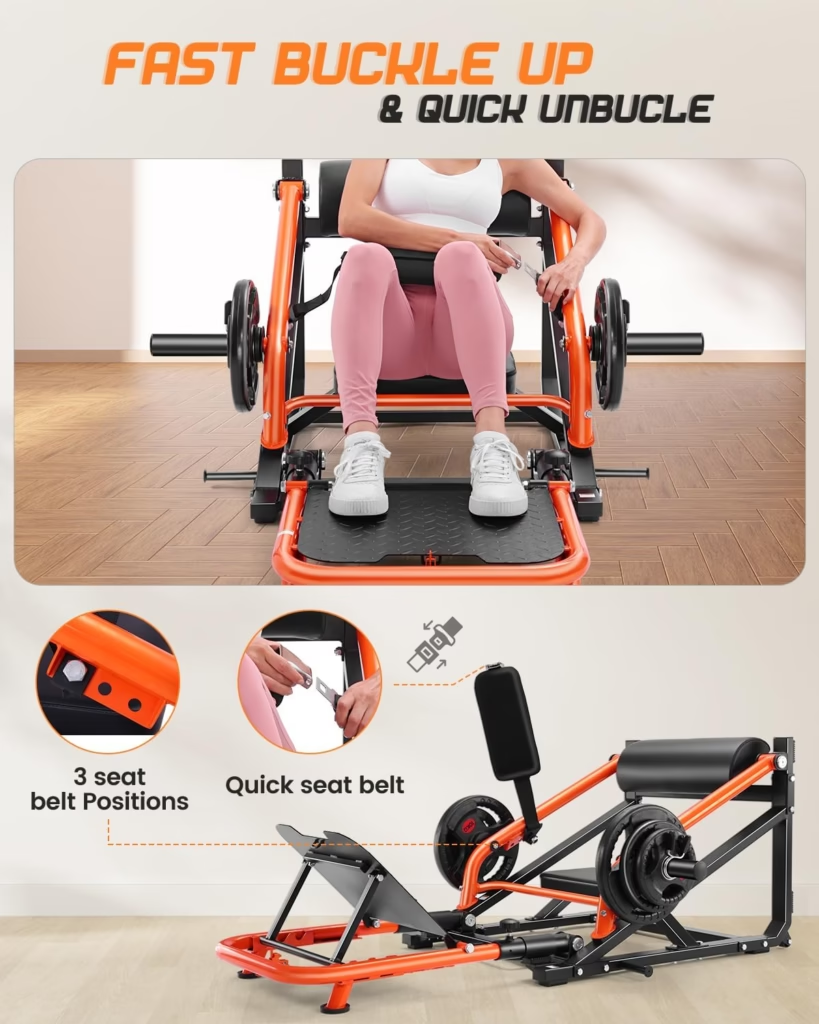
Step 4: Secure the Hip Pad/Belt
The padded bar or belt should sit snugly across your hips—right at your hip bones. It should be tight enough to stay in place but not so tight you can’t breathe comfortably.
The Movement: Step-by-Step Execution
Now comes the fun part—actually doing the exercise!
Phase 1: Starting Position
- Sit with your upper back against the pad
- Place your feet flat on the platform, shoulder-width apart
- Toes can point slightly outward (like 11 and 1 on a clock)
- Engage your core by pulling your belly button toward your spine
- Rest your hands on the machine’s handles or cross them over your chest
- Look straight ahead or slightly down—never at the ceiling
Phase 2: The Thrust (Pushing Up)
- Take a breath
- Drive through your heels—imagine you’re pushing the floor away from you
- Thrust your hips upward until your body forms a straight line from knees to shoulders
- Keep your ribs down (don’t arch your back)
- Your knees should still be at that 90-degree angle at the top
Mental cue: Think about “humping the air” with power. Sounds silly, but it works!
Phase 3: Peak Contraction (The Squeeze)
This is where the magic happens:
- Hold the top position for 2 full seconds
- Squeeze your glutes as hard as you possibly can
- Imagine you’re trying to crack a walnut between your butt cheeks (weird but effective!)
- Exhale at the top
- Feel the burn—that’s your glutes working hard
Phase 4: The Lowering (Coming Down)
- Slowly lower your hips back down
- Take about 2 seconds for this phase
- Keep tension in your glutes—don’t just let gravity drop you
- Stop just before the weights touch the stack (if using a selectorized machine) or just before your butt touches the seat
Phase 5: Repeat
- That’s one rep!
- Maintain a steady rhythm
- Focus on quality over quantity
- Keep thinking about your glutes doing the work
Perfect Form Checklist ✅
Before each set, mentally check:
- Shoulder blades supported on the pad
- Knees at 90 degrees at the top
- Driving through heels (not toes)
- Core engaged and tight
- Chin tucked, looking forward
- Glutes doing most of the work (not back)
- Controlled, smooth movement
- No excessive lower back arch
If you can check all these boxes, you’re doing it right!
Common Mistakes (And How to Fix Them)
Even with a machine, people make mistakes. Let’s fix them before they become bad habits.
❌ Mistake #1: Feet Too Close or Too Far
Why it matters: If your feet are positioned wrong, the load shifts away from your glutes to your quads or hamstrings. You’ll work hard but miss the point of the exercise.
The fix: Film yourself from the side at the top position. Your shins should be vertical, creating that perfect 90-degree angle at your knees. Adjust the platform forward or backward until you nail it.
❌ Mistake #2: Looking Up at the Ceiling
Why it matters: When you look up, your neck extends, and your lower back arches. This puts pressure on your spine instead of your glutes.
The fix: Pick a spot on the wall in front of you, about head height. Keep your eyes there throughout the movement. Your neck should stay neutral—imagine balancing a book on your head.
❌ Mistake #3: Rushing the Reps
Why it matters: Speed kills gains! When you bounce up and down quickly, you use momentum instead of muscle. Your glutes get less work, and you get less results.
The fix: Count out loud: “One-two up, squeeze-squeeze, one-two down.” This forces you to slow down and feel every rep.
❌ Mistake #4: Using Your Back Instead of Glutes
Why it matters: If you hyperextend your lower back (arch it excessively), you’ll end up with back pain instead of glute gains. Not fun.
The fix: Think about “tucking your tailbone under” at the top. Your glutes should do the pushing, not your spine. If you feel it in your back, reduce the weight and focus on form.
❌ Mistake #5: Not Feeling It in Your Glutes
Why it matters: If you complete your sets without feeling your glutes burning, you’re probably not activating them correctly. You’re just moving weight around.
The fix: Before your working sets, do 20 bodyweight glute bridges to “wake up” your glutes. This primes your mind-muscle connection. Then focus intensely on squeezing those glutes during every rep.
❌ Mistake #6: Going Too Heavy Too Soon
Why it matters: Ego lifting breaks down your form and increases injury risk. You might impress yourself loading up plates, but your results will suffer.
The fix: Master the movement with lighter weight first. Only add 5-10 pounds per week. Slow and steady wins this race.
Building Your Hip Thrust Workout Program
Knowing how to do the exercise is one thing. Knowing how often and how much is another. Let’s build you a real program.
For Complete Beginners (Weeks 1-4)
Your goal: Learn the movement pattern and build confidence. Don’t worry about heavy weight yet.
Protocol:
- Weight: Bodyweight or machine resistance only (no added plates)
- Sets and reps: 3 sets of 12-15 reps
- Frequency: 2 times per week (like Monday and Thursday)
- Rest: 60-90 seconds between sets
- Focus: Perfect form on every single rep
You should finish feeling like you worked your glutes, but not completely exhausted. Think of this as practice month.
For Intermediate Lifters (Months 2-6)
Your goal: Build strength and muscle size through progressive overload.
Protocol:
- Weight: Start at 50% bodyweight, add 5-10 lbs each week
- Sets and reps: 4 sets of 8-12 reps
- Frequency: 2-3 times per week
- Rest: 90-120 seconds between sets
- Focus: Challenging yourself while maintaining form
By month six, you should be lifting significantly more than you started with. Track your progress in a notebook or app!
For Advanced Athletes (6+ Months)
Your goal: Maximum strength, power, and development.
Protocol – Mix these throughout your week:
Heavy Day:
- 5 sets of 5 reps at 85% of your max
- Full 3 minutes rest between sets
Volume Day:
- 3 sets of 15-20 reps with lighter weight
- 90 seconds rest
Power Day:
- 4 sets of 8 reps with explosive movement
- 2 minutes rest
Frequency: 2-3 times per week, varying the style
Programming Tips That Actually Work
Frequency matters: Your glutes need about 48 hours to recover. Training them every other day works great. Daily? That’s overkill and will hurt your progress.
Pair smart: Hip thrusts work beautifully with squats, deadlifts, and lunges. Just don’t do all of them heavy on the same day!
Track everything: Write down your sets, reps, and weight every session. If you’re not tracking, you’re just guessing.
Listen to your body: Sore glutes the next day? Good! Sharp pain during the movement? Stop and check your form.
Are you starting to see how this all fits together? Consistent effort over weeks and months—that’s where the magic happens! ✨
Muscles Worked: What’s Actually Happening
Let’s peek under the hood and see which muscles are working when you hip thrust.
Primary Muscles (The Stars of the Show)
Gluteus Maximus 🍑
This is the big kahuna—the largest muscle in your body. When you thrust up, this muscle is working harder than almost any other exercise can make it work. It’s responsible for extending your hip (the main movement in this exercise).
When this muscle grows, that’s what creates the shape and strength everyone wants.
Gluteus Medius
This smaller glute muscle sits on the side of your hip. It helps stabilize your pelvis and keep your knees tracking properly. You don’t see it as much, but you definitely feel it working.
Gluteus Minimus
The smallest of the three, it works alongside the medius for hip stability.
Secondary Muscles (The Supporting Cast)
Hamstrings
These muscles on the back of your thigh help your glutes extend your hip. They assist in the movement but don’t dominate like in leg curls.
Core/Abs
Your abs and lower back muscles work to keep your torso stable and prevent your back from arching excessively. This is why you should engage your core!
Quadriceps
Your quads (front thigh muscles) do very little in this exercise—just some knee stabilization. That’s actually good! It means your glutes are doing the heavy lifting.
Why This Exercise Is “Glute-Dominant”
Unlike squats where your quads and glutes share the work, or deadlifts where your entire back gets involved, the hip thrust is special. It’s designed to isolate your glutes as much as possible.
The horizontal push pattern (thrusting forward rather than standing up) puts your glutes in their strongest position. That’s why you can typically lift heavier on hip thrusts than on squats once you’re trained.
Simple explanation: Your glutes’ main job is hip extension—opening up the angle between your thigh and torso. Hip thrusts do exactly that with maximum resistance right where your glutes are strongest. It’s a perfect match!
Frequently Asked Questions
Let’s tackle the questions people ask most often:
Q: Can beginners use a hip thrust machine? A: Absolutely! In fact, the machine is often easier and safer for beginners than using a barbell. The guided movement helps you maintain form while you’re learning. Start with light weight and focus on feeling your glutes work.
Q: How much weight should I start with? A: If you’re brand new, start with just bodyweight or machine resistance. Once you can do 15 controlled reps, add weight. A good rule of thumb is 50% of your body weight for your first weighted session.
Q: Will this make my glutes too big? A: You control your results through how much you lift and how often. Building significant muscle size takes months or years of consistent, progressive training. You won’t wake up one day with huge glutes by accident! Most people struggle to build enough muscle, not too much.
Q: Can I use this if I have lower back pain? A: Many people with lower back issues find hip thrusts help because they strengthen glutes without loading the spine like squats do. However, always check with your doctor or physical therapist first. Once cleared, start light and progress slowly.
Q: How long until I see results? A: Strength gains come fast—you’ll likely notice you can lift more weight within 2-3 weeks. Visible muscle changes typically show up in 6-8 weeks with consistent training and good nutrition. Everyone’s timeline varies based on genetics, training history, and diet.
Q: Machine vs. barbell—which builds more muscle? A: Both can build muscle effectively! The machine offers better isolation and safety. The barbell allows more weight and stabilizer engagement. The best one is the one you’ll actually do consistently with good form.
Q: Do I need a spotter? A: Nope! That’s one of the beauties of the machine. It has a fixed path and often safety features. Unlike a barbell squat where you might get stuck, you can safely stop a hip thrust at any point.
Your Next Steps: Taking Action Today
You made it through the complete guide! Now here’s what to do with all this knowledge:
Your Action Plan ✅
Step 1: Find Your Equipment
- Check if your gym has a hip thrust machine (ask the staff if you’re not sure)
- If working out at home, research machines that fit your space and budget
- No machine? You can start with barbell hip thrusts using a bench
Step 2: Start With the Beginner Program
- Week 1-4: Focus on bodyweight or minimal resistance
- 3 sets of 12-15 reps
- 2 sessions per week
- Master the form before adding weight
Step 3: Film Yourself
- Use your phone to record a set from the side
- Check your form against the checklist in this guide
- Make adjustments as needed
Step 4: Progress Slowly and Consistently
- Add 5-10 pounds per week if form stays perfect
- If something feels wrong, reduce weight and reassess
- Remember: consistency beats intensity every time
Step 5: Track Your Progress
- Keep a simple log of sets, reps, and weight
- Notice strength increases week to week
- Celebrate the small wins along the way
Final Thoughts
Building stronger glutes isn’t just about how you look in jeans (though that’s a nice bonus!). It’s about moving better, feeling stronger, and reducing pain in your daily life.
The barbell hip thrust machine makes this goal accessible, safe, and effective for people at every fitness level.
Whether you’re recovering from an injury, training for a sport, or simply want to feel more powerful in your body, this exercise delivers results.
The machine version removes the barriers that stop many people from doing hip thrusts—the discomfort, the setup time, the intimidation factor.
Start where you are. Use what you have. Do what you can. And remember: every strong person started as a beginner who refused to quit. 💪
Ready to feel the difference in your glutes, your performance, and your confidence? The hip thrust machine is waiting for you.
Now you know exactly how to use it!
Remember: This guide is for educational purposes. Always consult with a healthcare provider before starting any new exercise program, especially if you have existing injuries or health conditions.
© 2026 https://bestkettlebellsreview.com. All rights reserved.