3 Hip Hinge Cues
Latest Update: June 25, 2026
Did you know that 39% of nurses consider leaving their profession entirely due to the physical demands placed on their bodies, primarily from poor lifting mechanics? That statistic comes from a 2026 study of 40,000 healthcare workers across five countries, and it highlights exactly why we are writing about the 3 Hip-Hinge Cues that actually save your spine. Whether you are swinging an iron orb in your garage gym or lifting a patient at work, the way you hinge at your hips determines whether you build raw power or slowly destroy your lower back.
Tired of buying multiple kettlebells that clutter your home gym, only to find your lower back aching after every session? The problem usually is not the equipment, as we have found in nearly every kettlebell review we have published. Even the Best Kettlebells on the market will punish you if your hip-hinge mechanics are broken.
Imagine hitting the gym consistently for months, eating right, sleeping enough, yet still feeling like your muscle gains have stalled because your back pain forces you to skip training. That was my reality at 38. The fix was not a new program or a different bell. It was three simple cues that rebuilt my hip hinge from the ground up.
Visit Amazon for Best Kettlebell Deals
Key Takeaways
| Question | Answer |
|---|---|
| What are the 3 hip-hinge cues that actually save your spine? | Push the wall behind you (hip-dominant hinge), maintain a long spine with a proud chest (neutral alignment), and feel tension in your hamstrings instead of your lower back (proper load distribution). |
| How does the hip hinge protect the spine during kettlebell training? | The hip hinge shifts load from the small spinal extensor muscles to the large posterior chain muscles (glutes and hamstrings), dramatically reducing shear forces on the lumbar spine. Learn more in our senior kettlebell training guide. |
| Which kettlebell exercises require the hip hinge most? | The kettlebell swing, deadlift, and clean all depend on a proper hip hinge. The kettlebell russian swing and kettlebell one arm swing are particularly dependent on these cues for spine safety. |
| Can beginners use these hip-hinge cues safely? | Yes. A beginner kettlebell swing program should start with these three cues from day one. We recommend starting with a light bell and mastering the hinge before progressing to heavier weights. |
| What equipment is best for practicing safe hip-hinge mechanics? | Competition-style kettlebells with uniform dimensions across weight ranges are ideal because the handle stays consistent as you progress. Check our competition vs regular kettlebell guide for details. |
| How many kettlebell swings per day is safe with proper form? | With proper hip-hinge mechanics, 100 swings a day with kettlebell training can be safe and effective for conditioned lifters, but beginners should start with 30 to 50 reps and build gradually. |
Why Your Spine Hates a Bad Hip Hinge (and How the 3 Hip-Hinge Cues That Actually Save Your Spine Work)
The humble kettlebell has traveled a long road from niche strength tool to absolute cornerstone of the modern home gym. But that iron orb can be either your best friend or your worst enemy, depending entirely on how you hinge.
When you bend forward without engaging your hips properly, the load transfers directly to the lumbar spine. The small muscles in your lower back were never designed to handle hundreds of pounds of force. They act as stabilizers, not primary movers. When you force them to do the heavy lifting, you create the exact conditions that lead to herniated discs, muscle strains, and chronic pain.
A proper hip hinge, by contrast, recruits the glutes, hamstrings, and posterior chain as a unified system. These are the largest, most powerful muscles in your body. They were built to absorb and generate force. When you hinge correctly, the spine acts as a rigid lever that transfers force between your hips and the bell, rather than acting as the load-bearing structure itself.
This is why the 3 hip-hinge cues that actually save your spine matter so much. They are not just coaching tips for elite athletes. They are the mechanical instructions that keep your vertebrae stacked, your discs uncompressed, and your training sustainable for decades rather than weeks.
Improper hip-hinge mechanics can lead to spinal injuries with costs ranging from thousands to millions.
The financial reality of back injuries is brutal. We are not just talking about missed gym sessions. We are talking about medical bills, lost wages, and potentially career-ending chronic pain. Whether you are a home gym enthusiast or a healthcare worker lifting patients daily, the stakes are the same: your spine is irreplaceable.
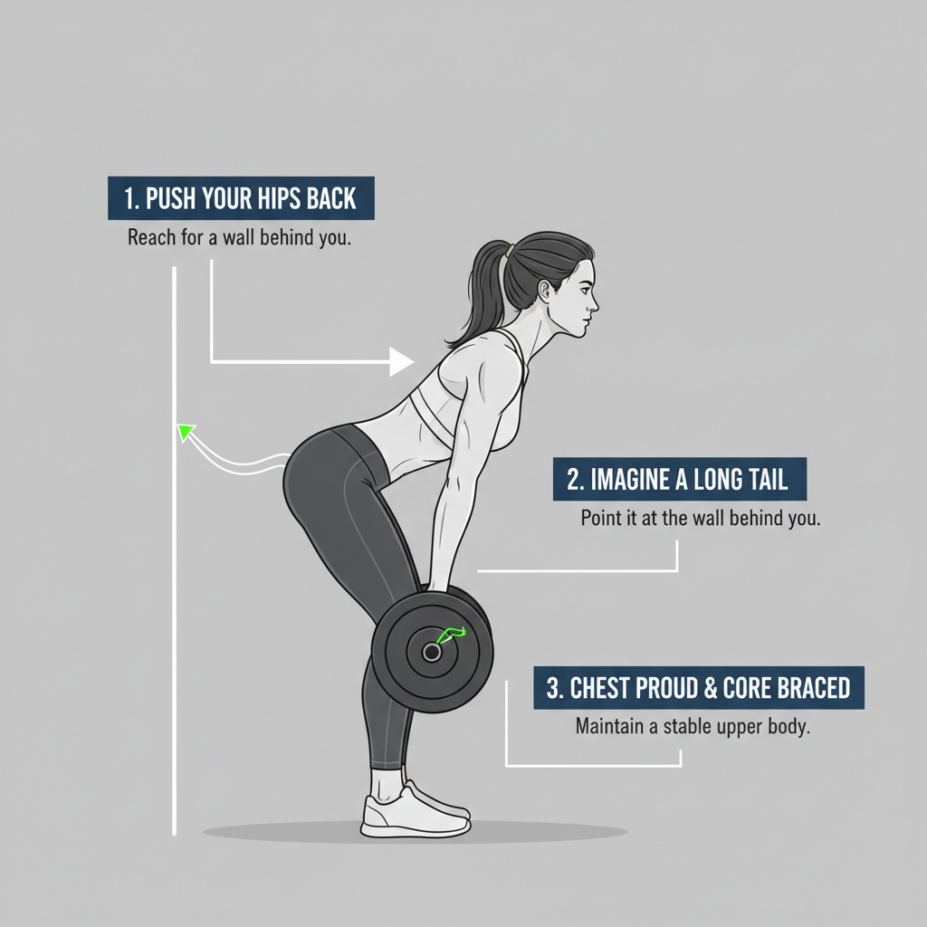
The 3 Hip-Hinge Cues That Actually Save Your Spine: Cue #1, “Push the Wall Behind You”
The first cue is the foundation of everything that follows. When you initiate a kettlebell swing or deadlift, most people bend their knees and squat the weight down. That is a squat pattern, not a hinge pattern, and it completely changes which muscles absorb the load.
Instead, imagine there is a wall directly behind you. Your goal is to push your hips back into that wall. Your knees will bend slightly, but only as a consequence of the hip movement, not as the primary action. The knees travel forward minimally, and the shins stay mostly vertical.
This cue works because it forces the movement to originate from the hip joint, which is a ball-and-socket joint designed for large ranges of motion and heavy loading. When the hips move first, the posterior chain engages immediately. Your hamstrings stretch under load, your glutes fire to decelerate the movement, and your spine stays in a neutral, protected position.
We see beginners fail this cue constantly, especially during the beginner kettlebell swing. They want to squat the bell between their legs, which shifts the load to the quads and knees while placing the lower back in a vulnerable, rounded position. The fix is simple: think “hips back, not knees down.”
For the kettlebell russian swing, this cue is especially critical. The Russian variation stops at chest height, which means the power comes almost entirely from the hip drive. If your hips are not moving back and then snapping forward, you are not generating power from the right place. You are muscling the bell up with your arms and lower back, which is exactly how injuries happen.
The 3 Hip-Hinge Cues That Actually Save Your Spine: Cue #2, “Long Spine, Proud Chest”
The second cue addresses what happens to your spinal alignment during the hinge. A neutral spine is non-negotiable, but most lifters either round their back (flexion) or over-arch it (hyperextension) without realizing it.
The cue “long spine, proud chest” gives you two simultaneous checkpoints. “Long spine” means you are creating length from your tailbone to the crown of your head. You are neither slouching nor arching. “Proud chest” means your sternum is lifted and your shoulder blades are drawn back and down, which automatically engages the lats and upper back stabilizers.
When your chest collapses during a kettlebell swing, your thoracic spine rounds, which cascades into lumbar flexion under load. This is the exact mechanism that causes disc herniations. The load that should be distributed across the entire posterior chain gets concentrated on the posterior elements of the lumbar spine, which are not built to handle that kind of shear force.
This cue also matters at the top of the swing. When the bell reaches chest height or overhead (in the american kettlebell swing), many lifters hyperextend their lumbar spine to compensate for weak glutes. The chest stays proud, but the lower back arches excessively. The fix is to squeeze your glutes hard at the top of every rep and brace your abs as if you are about to be punched in the stomach.
For women specifically, the kettlebell swing for women can be transformative for building posterior chain strength, but only if the spine stays neutral throughout. We have seen too many kettlebell swing workout routines that prioritize rep counts over spinal integrity, which is a recipe for injury.
The 3 Hip-Hinge Cues That Actually Save Your Spine: Cue #3, “Tension in the Hamstrings, Not the Lower Back”
The third cue is a feedback mechanism that tells you whether the first two cues are working. When you hinge correctly, you should feel a deep stretch in your hamstrings as the bell travels between your legs. If you feel tension building in your lower back instead, something is wrong.
This cue works because the hamstrings are the primary decelerators of the hip hinge. As the kettlebell swings backward, gravity pulls the bell down and your hips back. The hamstrings eccentrically load to control that descent. If they are doing their job, the lower back remains a neutral, static lever. If they are not, the lower back has to dynamically stabilize under load, which is exactly what causes muscle strains and ligament sprains.
To practice this cue, try a slow-motion kettlebell deadlift. Lower the bell over a count of five, focusing entirely on where you feel the tension. If it shifts to your lower back, stop, reset your spine to neutral, and push your hips further back. The goal is to make the hamstrings the star of the show.
This cue becomes even more important during high-rep training. If you are doing 100 swings a day with kettlebell training volume, fatigue will cause your form to drift. The hamstrings will stop firing efficiently, and the lower back will take over. That is when injuries happen. By actively cueing the hamstring tension on every single rep, you build a movement pattern that holds up even when you are tired.
Best Kettlebells for Practicing Safe Hip-Hinge Patterns in 2026
While it is a good practice for the visitor of any review site to treat every product recommendation with a healthy degree of skepticism, the right kettlebell genuinely makes a difference in your ability to hinge safely. We are not saying you need to empty your savings account, but the handle shape, weight distribution, and material quality all affect how the bell moves through the hinge pattern.
Competition-style kettlebells are our top recommendation for practicing the hip hinge. They maintain uniform dimensions across all weight ranges, which means the handle height and bell size stay the same whether you are swinging 12 kg or 32 kg. This consistency is critical for building motor patterns. Every time you pick up a differently shaped bell, you have to relearn the hinge trajectory, which is inefficient and slightly risky.
The Titan Adjustable Competition Style Kettlebell covers a full 12 kg to 32 kg range in one shell, which is the same working span many lifters buy across multiple bells. At a price point of $199.97, it replaces up to 19 individual kettlebells, making it incredibly space-efficient. For lifters who want to progress from a beginner kettlebell swing to heavy two-handed swings without buying a wall of iron, this is the most cost-effective option we have reviewed.
For those on a tighter budget, the 40 lb version of the Titan adjustable comes in at $119.99, which is an excellent entry point. You can read our full kettlebell review of the Titan here, where we break down construction quality, handle specs, and overall feel in the hand.
If you prefer traditional cast iron bells, we recommend starting with a single bell that matches your current strength level and working on your hinge mechanics before expanding your collection. Our kettlebell training equipment guide covers both budget and premium options for a complete setup.
How These Cues Apply to Every Kettlebell Swing Variation
The 3 hip-hinge cues that actually save your spine are not movement-specific. They apply to every variation of the kettlebell swing and every hip-dominant exercise you will ever perform. Let us break down how these cues translate across the most popular swing variations.
The Russian Kettlebell Swing: This is the gold standard for learning the hip hinge. The bell stops at chest height, which keeps the movement entirely in the sagittal plane and eliminates the overhead shoulder demands of the American variation. Cue #1 (push the wall behind you) drives the bell back between the legs. Cue #2 (long spine, proud chest) keeps the torso rigid as the hips snap forward. Cue #3 (hamstring tension) ensures the eccentric loading happens in the posterior chain, not the spine. Our Russian vs American swing comparison covers this in detail.
The American Kettlebell Swing: Also called the USA kettlebell swing, this variation takes the bell fully overhead. The hip hinge is the same, but the increased range of motion demands even more spinal control. Many lifters hyperextend at the top to get the bell overhead, which negates the spine-saving benefits of the hinge. Maintain cue #2 aggressively throughout the entire arc.
Visit Amazon for Best Kettlebell Deals
The Kettlebell Single Arm Swing: The one arm kettlebell swing introduces rotational forces that challenge spinal stability. The hinge mechanics remain identical, but you must fight harder to keep your torso squared and your spine neutral. The free arm should swing in opposition to the working arm, creating a counterbalance that actually helps maintain alignment.
The Kettlebell Side Swing: The side to side swing adds a frontal plane component. The hip hinge still initiates each rep, but the bell travels side to side rather than front to back. This variation demands exceptional core control to prevent the lumbar spine from rotating under load.
Kettlebell Swing Cardio: When you use the swing as a conditioning tool, fatigue becomes the biggest risk factor. High-rep kettlebell swing cardio sessions are excellent for fat loss, but they are also where most hinge breakdowns occur. Keep your rep ranges manageable (sets of 10 to 20) and reset your three cues between every set.
For a structured approach, our kettlebell workout routines for weight loss guide provides progressive programming that respects these cues while building cardiovascular capacity.
Hip-Hinge Training for Longevity: Why These Cues Matter Most After 50
Search interest for adjustable kettlebells peaked at a perfect score of 100 in November 2025, signaling a massive consumer shift toward smarter, more space-efficient training tools. But behind that data point is a deeper story. A significant portion of that interest comes from lifters over 50 who are discovering that the kettlebell, when used with proper hip-hinge mechanics, is one of the most joint-friendly tools available.
A 12.7% increase in bone mineral density at the femoral neck was recorded in female participants over 70 after just 16 weeks of kettlebell training. That is remarkable, and it underscores why the hip hinge is so valuable for aging lifters. The femoral neck is the most common fracture site in osteoporotic hips. The hip hinge directly loads this area through the posterior chain, stimulating bone growth in exactly the location that needs it most.
The hip hinge emphasizes safety for joints and spine in older adults more than any other movement pattern. As we age, spinal discs lose hydration and become less resilient. The margin for error shrinks. A rounded back that a 25-year-old might shake off becomes a herniated disc at 55. This is why the 3 hip-hinge cues that actually save your spine are not optional for older lifters. They are mandatory.
Our adjustable kettlebell for seniors guide recommends starting with light weights and focusing entirely on hinge mechanics before adding load. The adjustable mechanism allows gradual progression without buying multiple bells, which is ideal for lifters who want to train safely without cluttering their home.
For a broader perspective on training philosophy for the 50+ demographic, our functional longevity training guide covers how deadlifts, swings, and mobility work combine to build a body that lasts.
Common Hip-Hinge Mistakes That Destroy Your Lower Back
Even with the three cues memorized, certain mistakes creep in and undermine spine safety. Here are the most common ones we see in our coaching and review work.
- Squatting the bell: Bending the knees too early and too much turns the swing into a squat. The bell drops straight down instead of traveling back, and the posterior chain never fully engages. Fix: exaggerate the hip push-back and keep your shins vertical.
- Looking up: Craning the neck to look at the horizon forces cervical extension, which cascades into thoracic and lumbar extension. Fix: keep your neck in line with your spine. Your eyes should follow the angle of your torso.
- Rushing the eccentric: Letting the bell drop too fast between reps removes the hamstring-loading phase entirely. The bell yanks your arms, and the lower back absorbs the deceleration force. Fix: actively meet the bell on the way down and load the hamstrings under control.
- Forgetting to breathe: Holding your breath or breathing shallowly removes the intra-abdominal pressure that supports the spine. Fix: inhale sharply on the eccentric (bell going back) and exhale forcefully on the concentric (hips snapping forward).
- Going too heavy too soon: The kettlebell golf workout trend and other high-intensity programs sometimes encourage swinging heavy bells before the hinge pattern is solid. Fix: master the perfect kettlebell swing with a light bell first. Your spine will thank you.
Research shows that kettlebell sessions burn approximately 20-25% more calories than equivalent dumbbell workouts, making that iron orb a seriously underrated tool in the average home. But none of that matters if you are injured. The calorie burn is only accessible if your spine can handle the volume, and your spine can only handle the volume if your hip hinge is dialed in.
Conclusion: The 3 Hip-Hinge Cues That Actually Save Your Spine
to keep the spine neutral under load. And feel the tension in your hamstrings, not your lower back, to confirm that the posterior chain is doing the work it was built to do.
Whether you are aiming to torch fat with high-intensity intervals or build raw power through traditional strength training, selecting the right equipment and the right mechanics is the first step toward success.
We have spent years reviewing the Best Kettlebells and publishing detailed kettlebell review content to help you make informed decisions, but no bell on the market can compensate for a broken hinge pattern.
I hope that you have a useful and meaningful experience as a direct result of our detailed reviews and articles. Train hard, hinge correctly, and protect the one spine you have.
Visit Amazon for Best Kettlebell Deals
Frequently Asked Questions
What are the 3 hip-hinge cues that actually save your spine?
The three cues are: (1) push the wall behind you to initiate the hinge from the hips, (2) maintain a long spine with a proud chest to keep the spine neutral, and (3) feel tension in the hamstrings instead of the lower back to confirm proper load distribution. These cues work together to shift force from the small spinal muscles to the large posterior chain muscles.
Is the kettlebell swing safe for my lower back?
Yes, the kettlebell swing is safe for your lower back when performed with proper hip-hinge mechanics. The swing is actually one of the best exercises for strengthening the posterior chain and protecting the spine, but only if you follow the 3 hip-hinge cues that actually save your spine. Without proper form, the swing can absolutely cause back injuries.
Should beginners start with the Russian or American kettlebell swing?
Beginners should always start with the kettlebell russian swing. The Russian variation stops at chest height, which keeps the movement in the sagittal plane and eliminates the overhead shoulder demands that make the American swing riskier for novices. Master the hip hinge with the Russian swing before attempting the American variation.
Can I do 100 swings a day with a kettlebell safely?
Doing 100 swings a day with kettlebell training can be safe for conditioned lifters who have solid hip-hinge mechanics. However, beginners should start with 30 to 50 reps per session and build gradually. Volume without form is the fastest path to a back injury, regardless of how good your equipment is.
What weight kettlebell should I use to practice the hip hinge?
We recommend starting with a weight that allows you to perform 10 perfect reps without any form breakdown. For most beginners, this means 8 to 12 kg for women and 12 to 16 kg for men. An adjustable kettlebell is ideal because it lets you progress gradually without buying multiple bells.
How does the hip hinge benefit older adults and seniors?
The hip hinge directly loads the femoral neck through the posterior chain, which stimulates bone growth in the most common osteoporotic fracture site. Research shows a 12.7% increase in bone mineral density at the femoral neck after 16 weeks of kettlebell training in women over 70. The hip hinge is also the most spine-safe movement pattern for aging joints.
Can I swing a kettlebell with a dumbbell instead?
Yes, you can perform a kettlebell swing with a dumbbell, but the mechanics differ slightly due to the dumbbell’s center of mass. The off-center mass of a kettlebell actually makes the hip hinge more natural because the bell pulls you into the hinge pattern. If you only have a dumbbell, hold it vertically by one end and focus on the same three cues.